How to Create a Shot List That Works
When you imagine your life as a cinematographer, you may think of yourself behind the camera spending long days on set making bold artistic decisions. However, what many people don’t realise is that cinematography is as much about organisation as it is about artistry. When a cinematographer comes to set armed with a detailed plan of what they want to shoot and when the entire production can run smoothly and efficiently.
This is where learning how to create a shot list comes into play. The shot list is the roadmap that the cinematographer and the rest of the crew can follow each day on set. In this article, we’ll be discussing how to write a shot list and how to make a shooting script that really works.
What is a Shot List?
The shot list, also known as a shooting script, is a key document in any professional film production. It is a to-do list of every shot in the film that the cinematographer plans to shoot, mapped out in detail. A good shot list is organised by shoot day.
Essentially, the document acts as both the shot checklist and the filming schedule. Using the shot list, you’ll know everything about what you need to shoot, including shot type, actors, camera type, and so on. You’ll also know what order to shoot in, helping to avoid confusion and disorder on set.

Step 1: Break Down the Script
The first step is to break down the script into logistical details. By breaking down the script, you’ll start to have a better idea of what is required for each scene. This will help you to organise a filming schedule and create a plan for each shoot day.
Depending on the size of your production, this task may fall to someone else on the team. However, here are tips on breaking down the script in case you have been given the responsibility of scheduling.
Create a spreadsheet that includes the following information:
- Location
- Interior vs exterior
- Time of day
- Page count
- Characters
- Extras, if any
- Notes
Looking at this information will help you to determine which scenes to group together into shooting days. The most important factor to consider will be the location, time of day, and actors. Grouping together scenes based on where and when the shooting will take place will save you time and money.
Be sure to also pay close attention to the page count for each scene. Typically, a film crew can get through around 5-7 pages a day, so be careful not to schedule too much or too little per day.
Step 2: Make a Storyboard
You may or may not choose to create a storyboard. Some directors and cinematographers like to create a visual guide to the film before writing out the shot list. Plus, drawing rough sketches of the action can be a helpful way for the director and the cinematographer to collaborate and communicate about how they want the film to look.
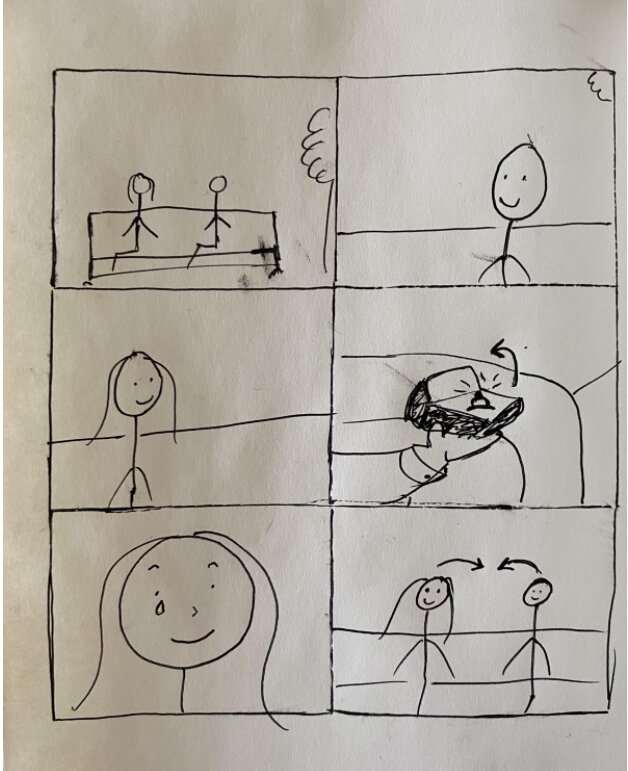
Think of the storyboard as a comic book version of the script. Sketching out the various shots you envisage will give you an idea about which moments need to be captured, and what type of shot you will use to capture them. For instance, if you envisage the opening of a scene to be a wide shot, you’ll know to include this shot in your shot list. Try to include notes about camera movements and action within the shot. Arrows and notes can be helpful to illustrate movement.
Let’s look at an example from a made-up film script.
Here’s the script:

And here’s a potential storyboard (note that fine art does not have to be your speciality!):

Every cinematographer will have their own method of storyboarding. Some will only include images, while others will leave space for notes beside each image. To keep your storyboard organised, you may choose to annotate your script. This will help you and your crew to match your sketches to moments and lines in the script.
The storyboard should include every shot you need to tell the story according to your artistic vision. A basic storyboard will also help the editing team to cut the film together according to the director and the DP’s vision.
Add Your Heading Text Here
The next step in how to make a shooting script is to start the actual camera shot list. Break down each scene into every shot you will need to capture. The story board can become very useful at this stage, as it will ensure you don’t miss any crucial shots you need to tell the story.
Begin with your wides, mediums, and close ups, then list any inserts you plan on shooting. Finally, if you have any shots you hope to capture, include these as well. These shots may be more complex to set up or to achieve, while not being essential to the story telling. Think of these shots as your best case scenario shots that you will attempt if time allows on the shoot day.
For most standard scenes, you will want to capture one or more wide establishing shots that show the audience the space and the characters. You’ll also likely want to capture medium shots of each character, or of several characters together. Your close up shots may be reserved for characters with more intense emotional beats in the scene.
Here’s an example of a shot breakdown from the scene we used above:
SCENE 1 – Man and woman on park bench – Proposal scene (script pages 1)
WS: Back of park bench with man, woman
MS: Man
MS: Woman
MS: Man and Woman
CU: Woman
INSERT: Man holding and opening wedding ring box
DREAM SHOT: CU reflection of woman in wedding ring
By using your storyboard, you’ll know which wide shots, medium shots, and close ups are needed. For instance, in the above example, only one character, the woman, needs a close up shot. As you can see, the above shots are all needed to tell the story in the script. The “dream shot” is a more complex, artistic shot that isn’t required for effective storytelling. However, if time permits, you and the crew can try to capture it.
Complete this list of shots for each scene in the script. You will end up with a list of every single shot you need (and hope) to capture to tell your story.
Put all of this information into a spreadsheet or into your own shot list template. This template should include the following important details about each shot:
- Scene number
- Shot number
- Location (interior/exterior)
- Shot description (notes about camera angle, movement, audio requirements)
- Shot type (wide, medium, close up, etc.)
- Equipment (tripod, drone, handheld, etc.)
- Action/dialogue (how much action of the scene do you need to capture?)
- Actors
- Props needed
- Other notes
You may also wish to leave a blank column for “best take”. This will be incredibly useful for your editor as they go through the footage later.
Step 4: Arrange Each Scene by Shooting Day
Whether or not you are responsible for breaking down the script into shooting days, you will need to have a breakdown of which scenes are being shot when. Depending on logistics such as the location, time of day, actors, and so on, the script is usually shot in a jumbled order.
The next stage of how to create a shot list is to organise your list of shots by shooting day. This will likely mean grouping together scenes that do not follow each other chronologically.
This stage is fairly simple and only involves re-ordering the shot list you have already created.
Step 5: Arrange Each Shooting Day into Filming Order
Once your shot list is re-organised by shoot day, the final stage is to organise the shot order for each day. At this stage, you’ll decide the exact order you plan to shoot in. This step is crucial to creating a great shot list, as it will streamline the shooting process.
Think about how you will set up each shot. Look at which filming equipment is required for each shot, which actors, which camera lenses, and so on. Try to arrange the shots in an order that makes sense.
Begin with complex shots that require difficult setups. Get them out of the way when energy and morale is high. Then, group shots together that use the same lens or the same lighting. This way, you will minimise the setup time between shots, and the shooting process will hum along without too many hitches or unnecessary breaks. Leave inserts for the end of the day.
The Takeaway
Using this carefully organised and detailed shot list, you will hopefully find that filming is far less complicated and hectic than it could have been. By planning your shooting schedule with a good shot list, you will avoid wasting time and energy. You’ll also ensure that you don’t miss any shots as you go. By using a shot list, you and the rest of the team will have the luxury of time once you get on set. With time comes the freedom to experiment with a few interesting shots, and let the actors try a few extra takes. Essentially, you’ll have the chance to make the best film you possibly can.
